When it comes to tools for viewing website insights, Google Analytics is an inevitable tool that allows you to view information on a website when visited, such as the number of website visitors. Various channels connected to the website new visitor old visitor Website traffic bounce rate and much other information
As you see an example of the oriented data given above, do not panic, in this article, we will teach you how to install Google Analytics with a step-by-step version that you can do yourself. Then, you can slowly study and learn how to use it.
In this article:
- Prerequisites to start installing Google Analytics
- How Google Analytics works
- Analytics Tag workflow
- Start your Google Analytics account
- How to install Google Analytics
- Explore menus and information on Google Analytics
Prerequisites to Start Installing Google Analytics
First of all, to begin the installation process, let’s check what preparations can be made to implement Google Analytics?
- Website – You must have your website. That means you can’t view statistics or insights from other websites. Once you have your website and install it, you also need access to the website’s backend system.
- Google Analytics Account – You’ll need a Google Analytics account, so you’ll need to start signing up if you don’t already have one.
- The Analytics Tag – We need this for implementation includes a Google Analytics tag or snippet code, that is used to capture various data values, collect them, and send them to Google Analytics for display purposes. Don’t worry and let’s study together in this article.
How Google Analytics works
For looking at how Google Analytics works, we need to understand how its structure works. The structure of Google analytics is divided into 3 levels: 1. Account 2. Property 3. View. Each level will have different functions and methods of use.
-
Account
For an Account or User Account, you must have a user account first. At this level, Google Analytics allows you to create multiple accounts and in one account, you can have many websites. In this account section, the system allows you to set up an account, for example, general settings Naming or editing a username, user’s country, adding users who have access to an account, and filtering settings
-
Property
In this level, Property is a level that allows you to manage the website without having to specify the website that you want to add. The specialty about this is that when you create a Property, you’ll be prompted to choose a form of data measurement or data reading. You can choose from 3 types: Type 1 Website, Type 2 Apps, Type 3 Apps, and Web. The system will provide details of the type you choose and set up data retrieval or even connect to other add-ons that help in enhancing the functionality of Google Analytics even more.
-
View
At this level, you can manage the view style of your website’s Google Analytics for the system to calculate and display the results, according to our settings. This includes setting goals for the data retrieved from the website, showing results based on Google Analytics calculations, or setting up data analysis and content management.
Analytics Tag Workflow
Before getting to the installation process, we need to understand the process of Analytics Tag first. In the process of Analytics Tag, we take the code from Google Analytics, which is a directive type code, for installing on the website to collect data. When the user comes to the website and does some activities. Then, this set of code collects user activity data and sends that collected data to Google Analytics to show us the report.
If you just use Google Analytics, please read here.
Start Your Google Analytics Account
Now that you’ve understood the Tag workflow and how Google Analytics works, here’s a tutorial on how to install it, which is just a few steps, and how to check the usage after the installation is complete.
If you haven’t Google Account, you need to create it first.
The tutorial is as follow:
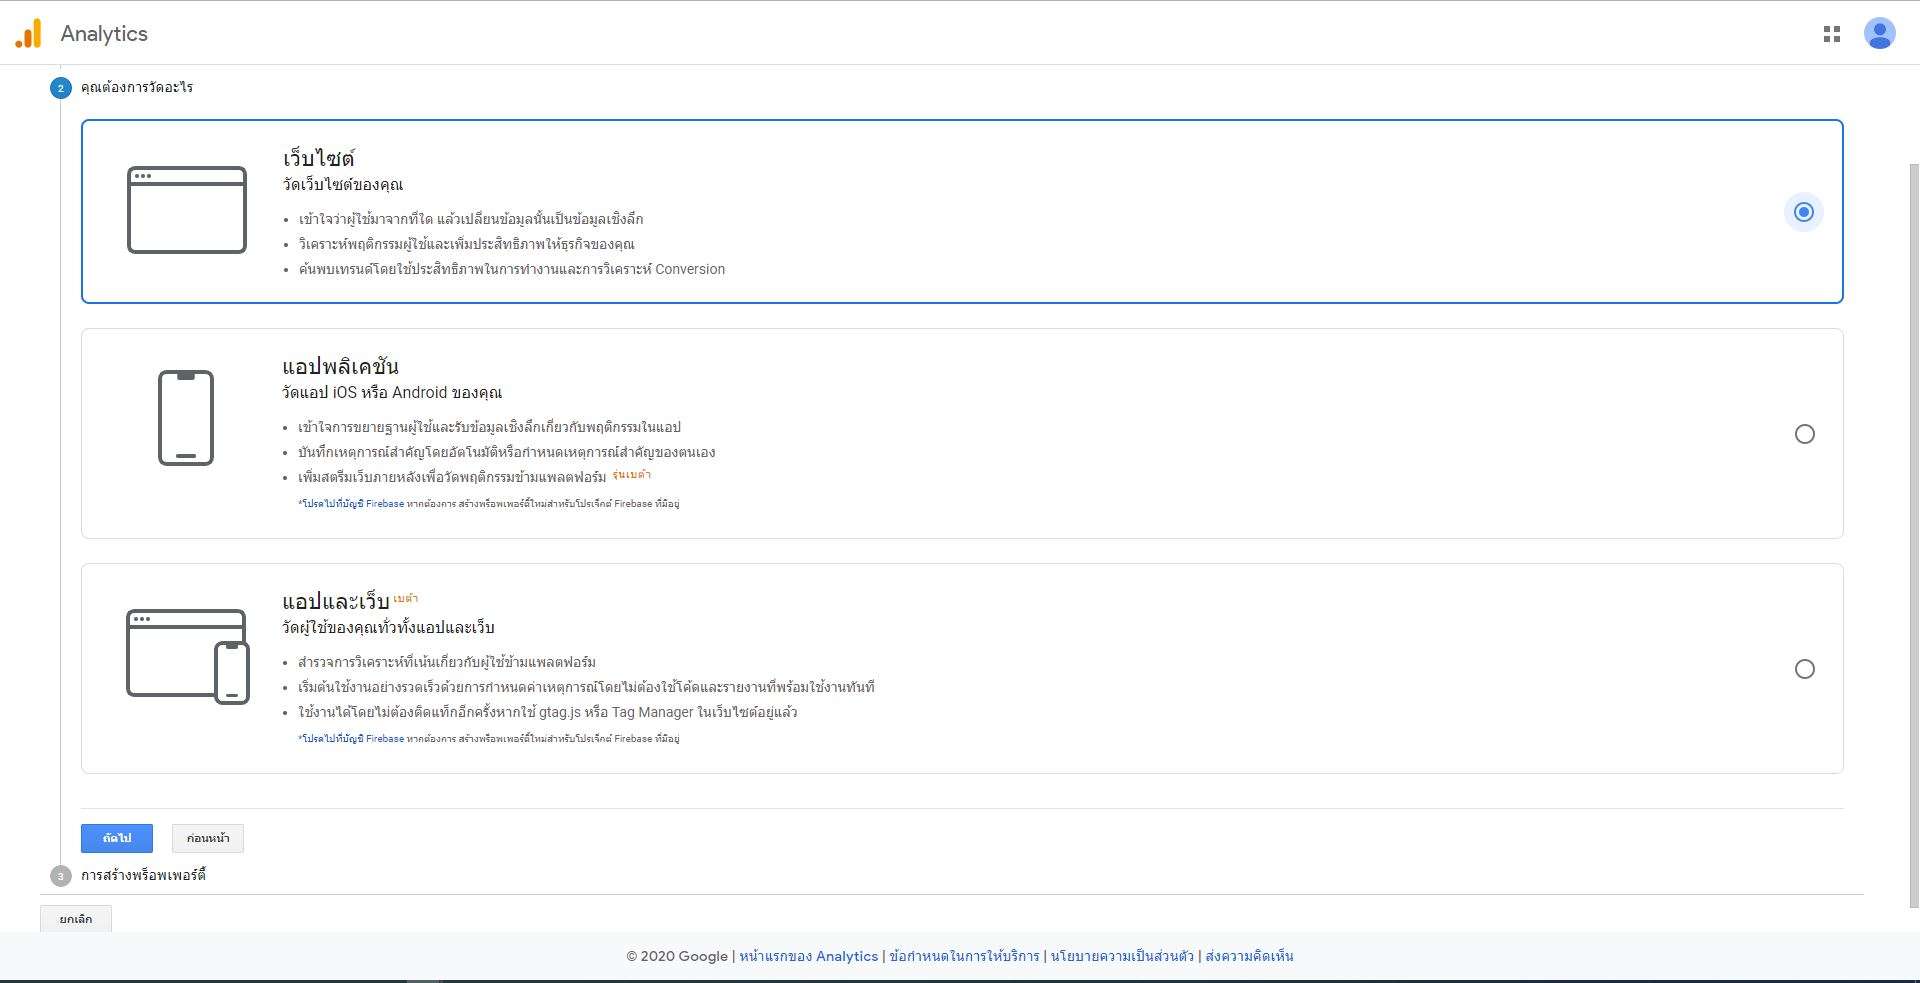
1. Get into Google Analytics (https://analytics.google.com/)
2. The Website will make you start by signing in.
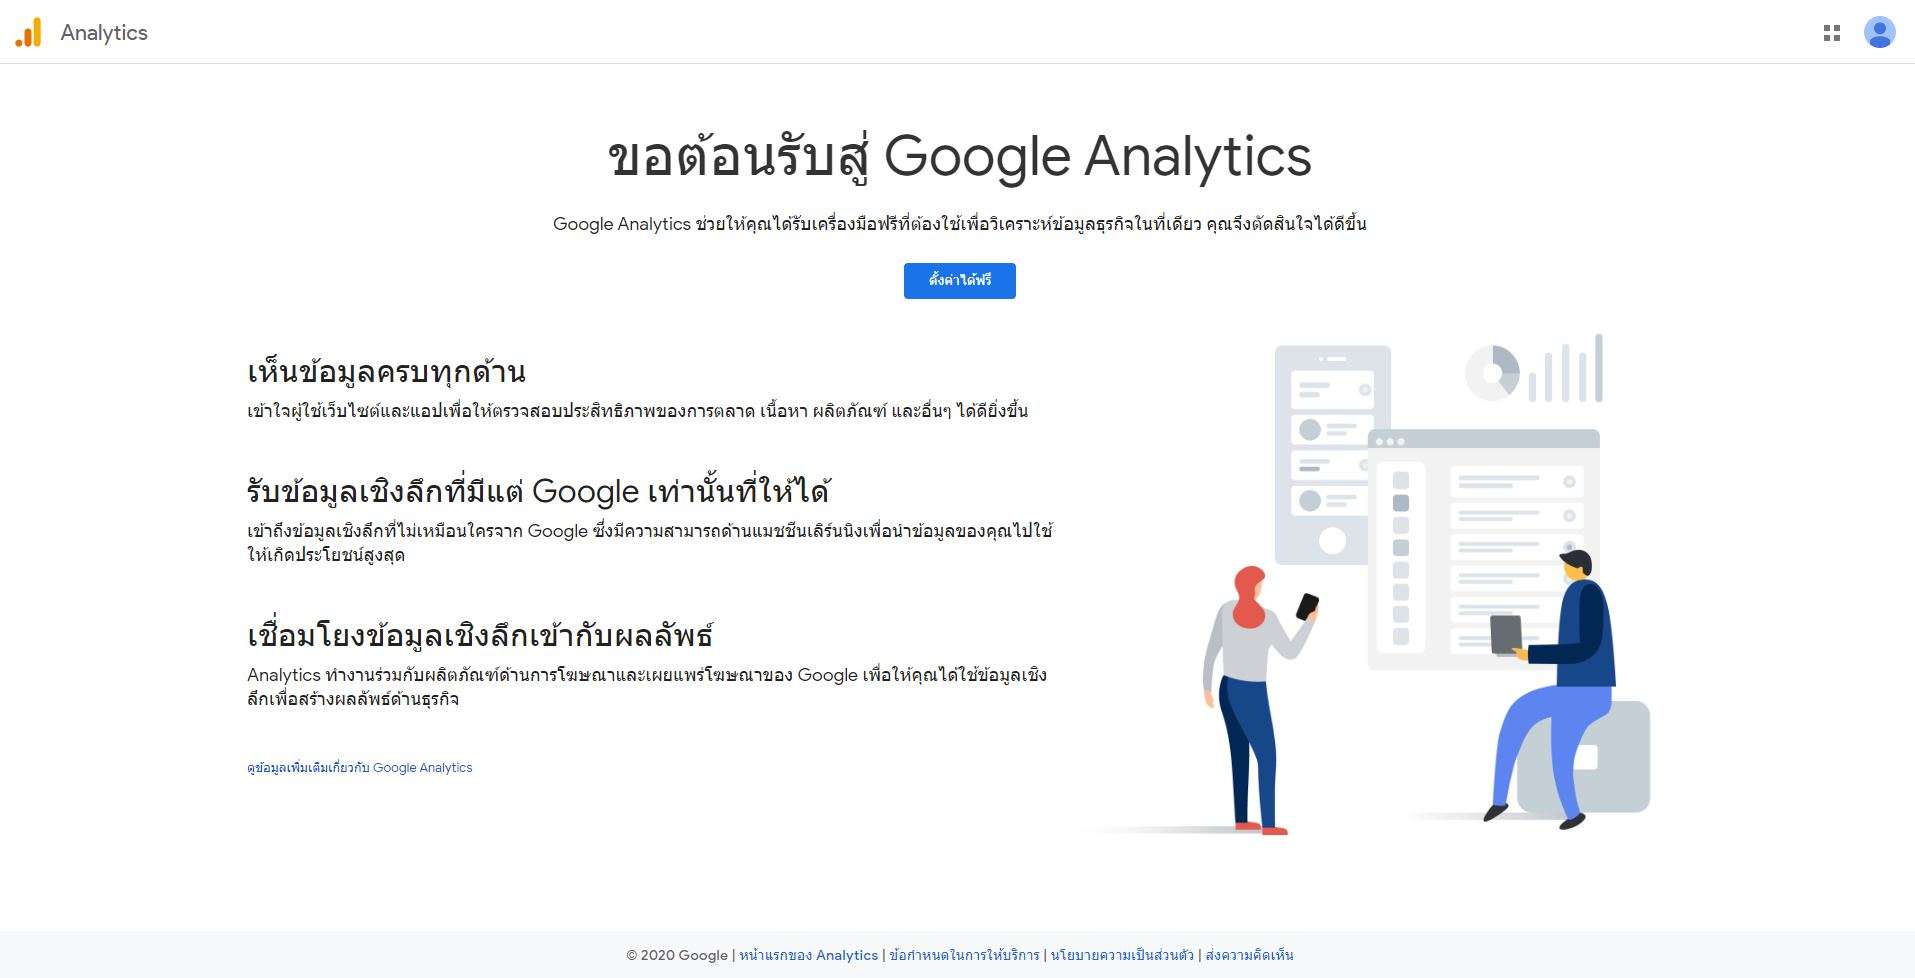
3. Set your account name and share your usage information
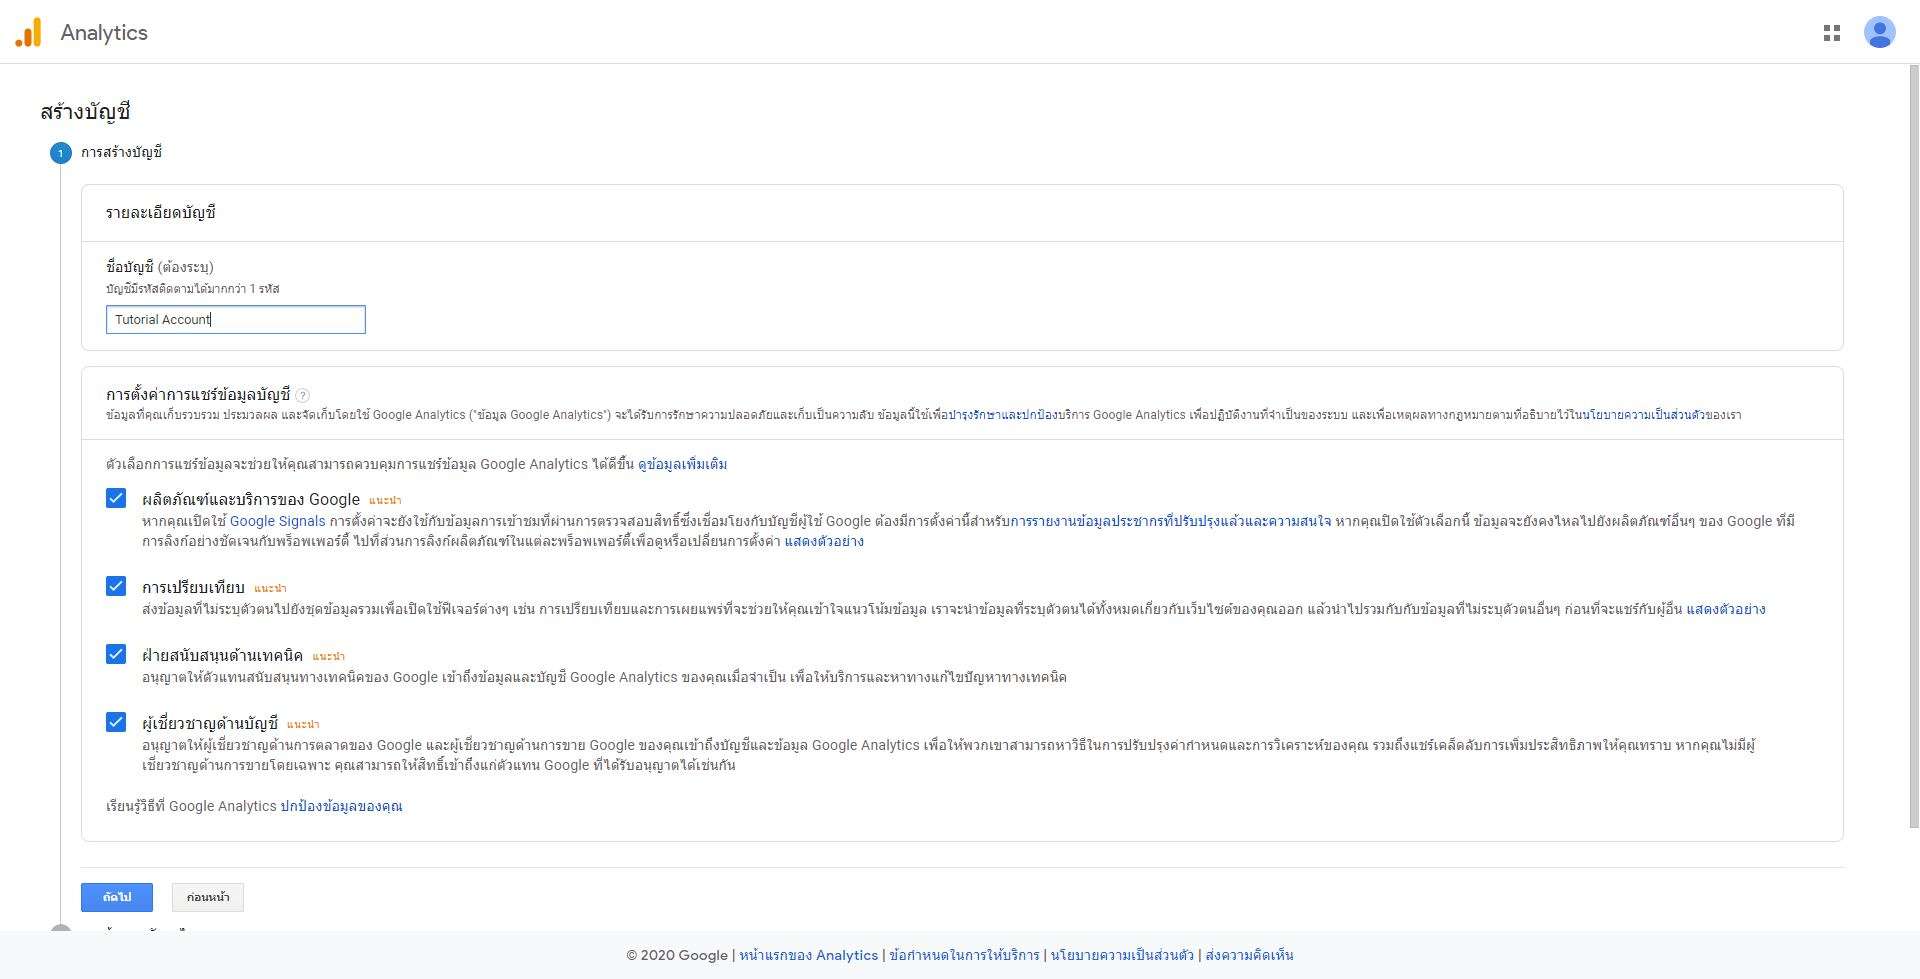
4. Select the format you want to measure. As an example, there are three types: Website measurement, Application Measurement, and Applications and Websites Measurement
5. Create Property for the website by entering the information of the website name > Enter the website link URL > Category of the website > Time zone of the website.
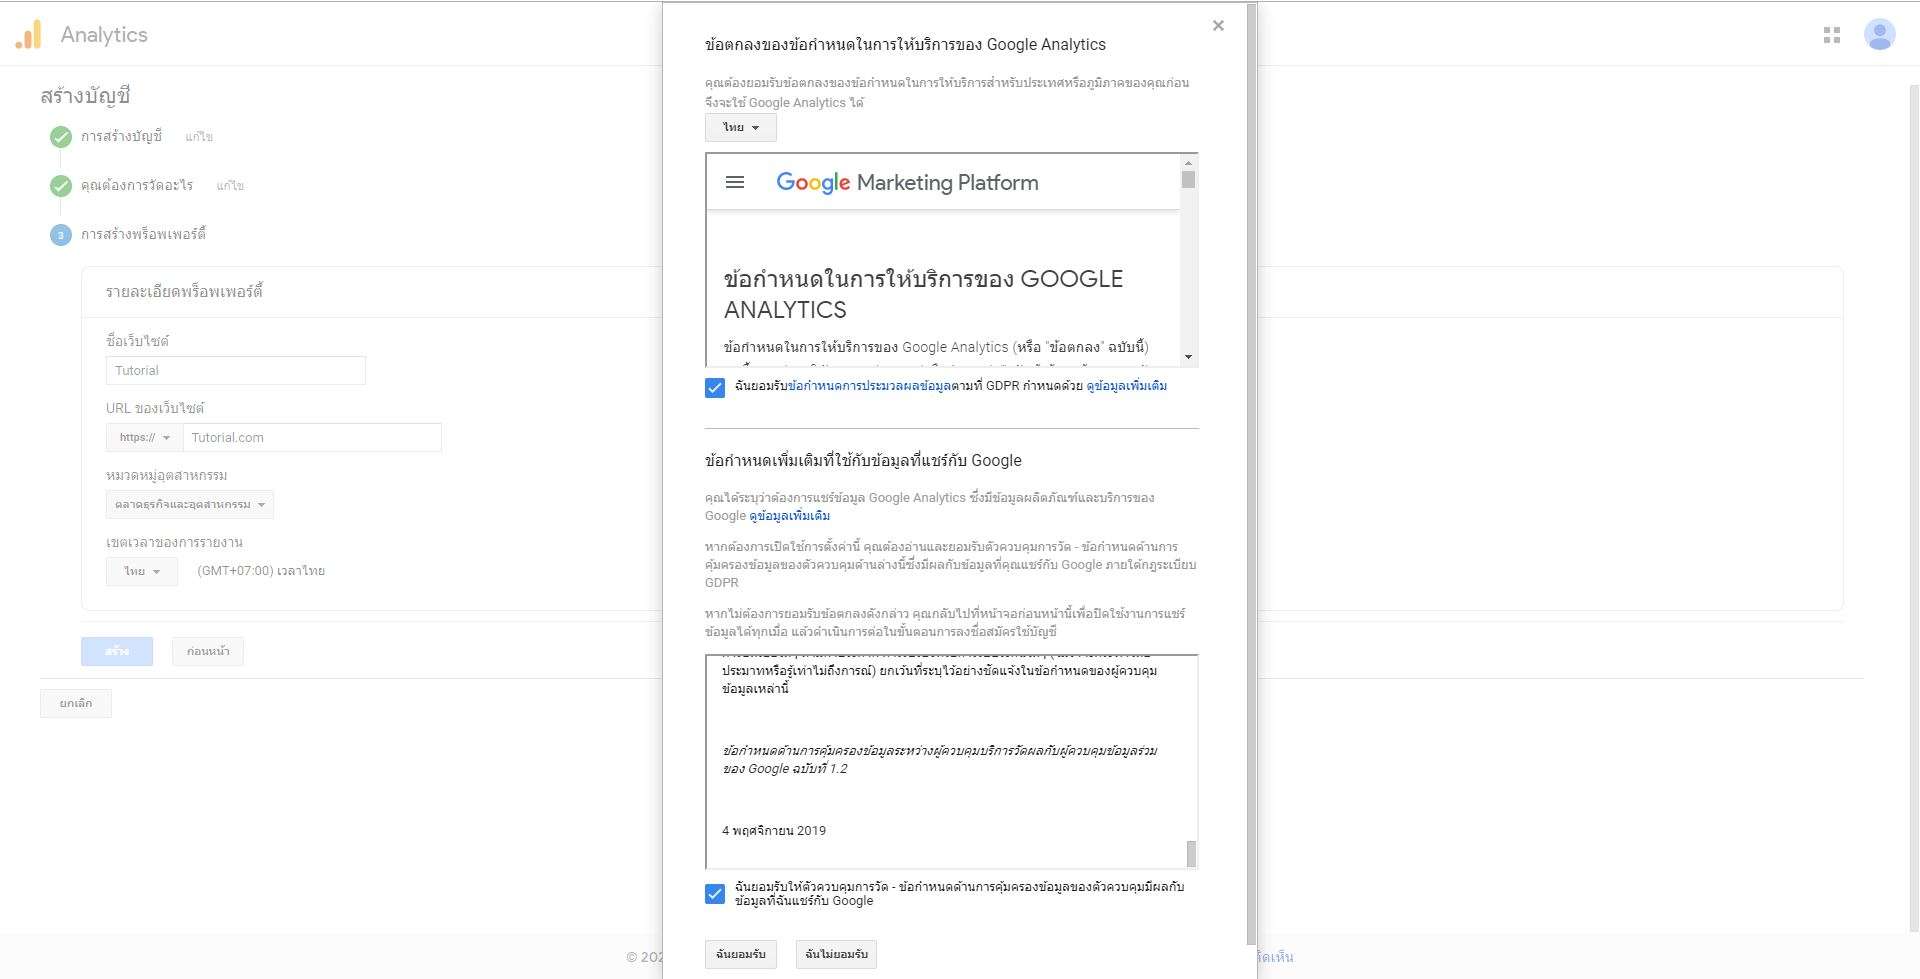
6. Read and review the Terms of Service of Google Analytics, then click the box when reading both sections of the Terms. So, click on the accept button below to complete the process of opening a Google Analytics account, then click Create to proceed with the creation.
How to install Google Analytics
For how to install Google Analytics, we need to go to the Settings page of Google Analytics first because the installation requires a set of codes to install on the website. We can’t install it directly through Google Analytics.
How to set up
1. Go to the Settings page of Google Analytics *For those who already have an account. You should also check whether the website that we will install is correct or not. You can do this by clicking the triangle button under the Property category, but for those who are just starting, you can skip to Step 2.
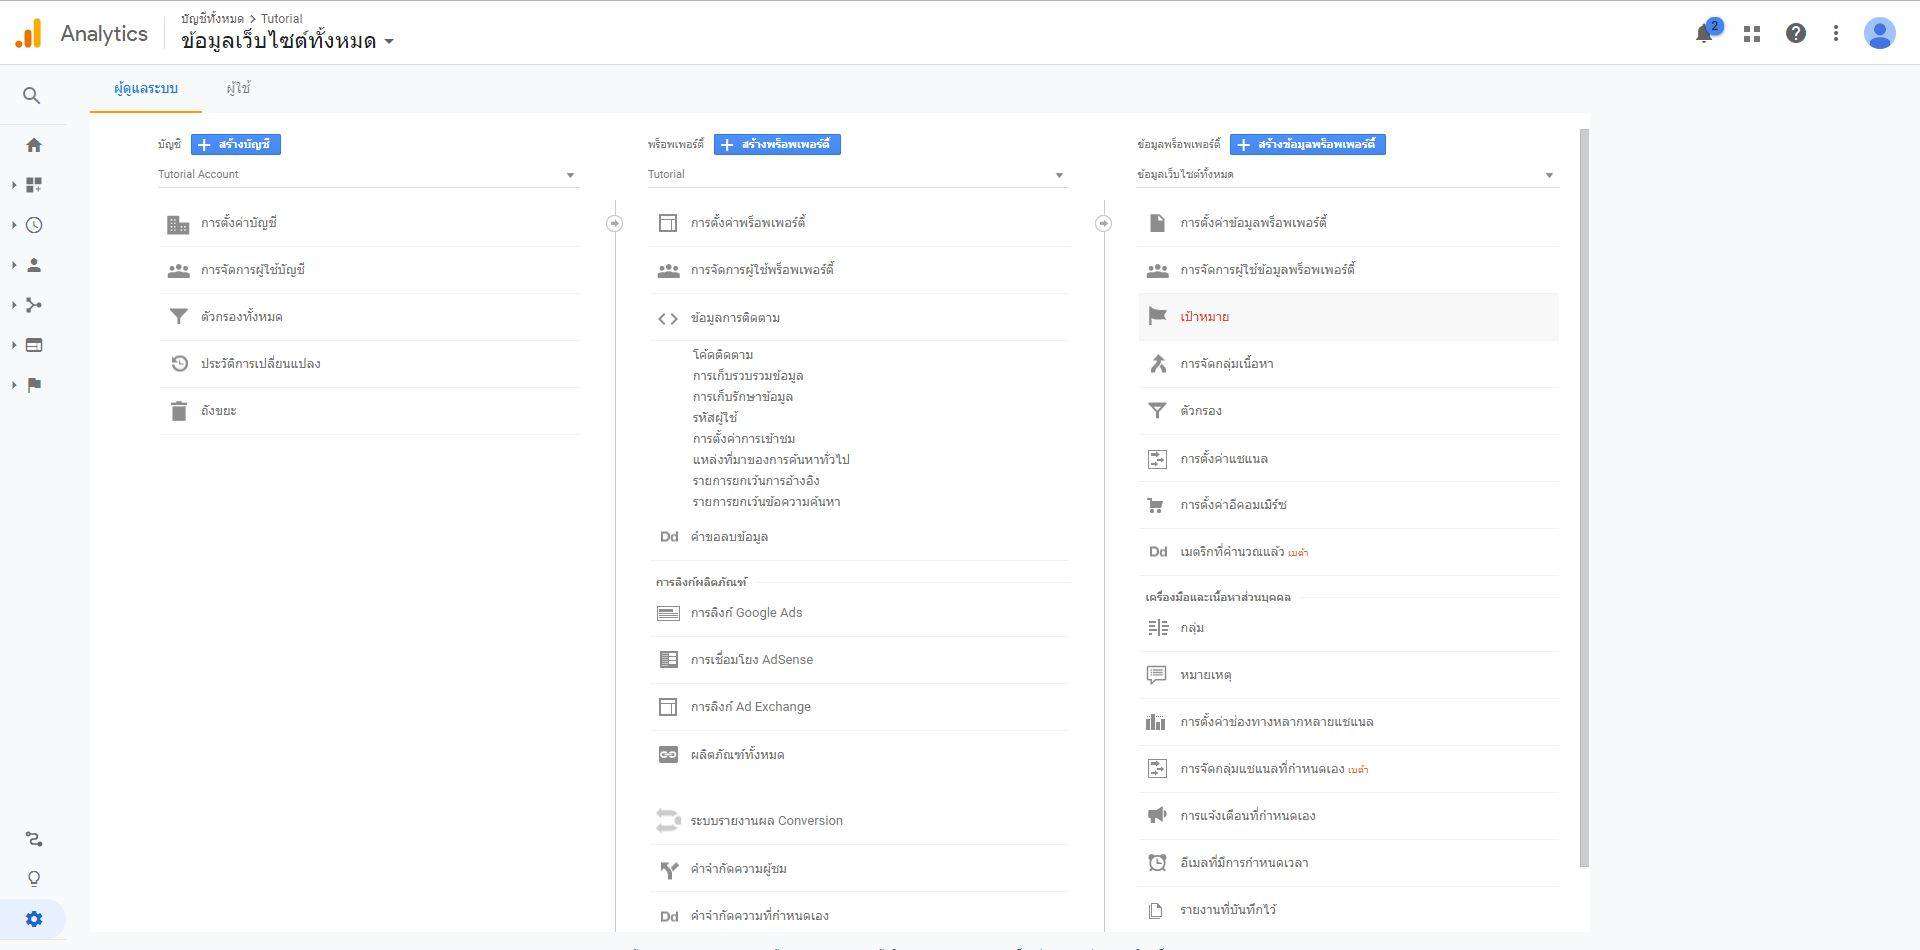
2. Go to the sub-menu Tracking info in Property
3. Choose Tracking code and it will appear as a set of codes. You can copy it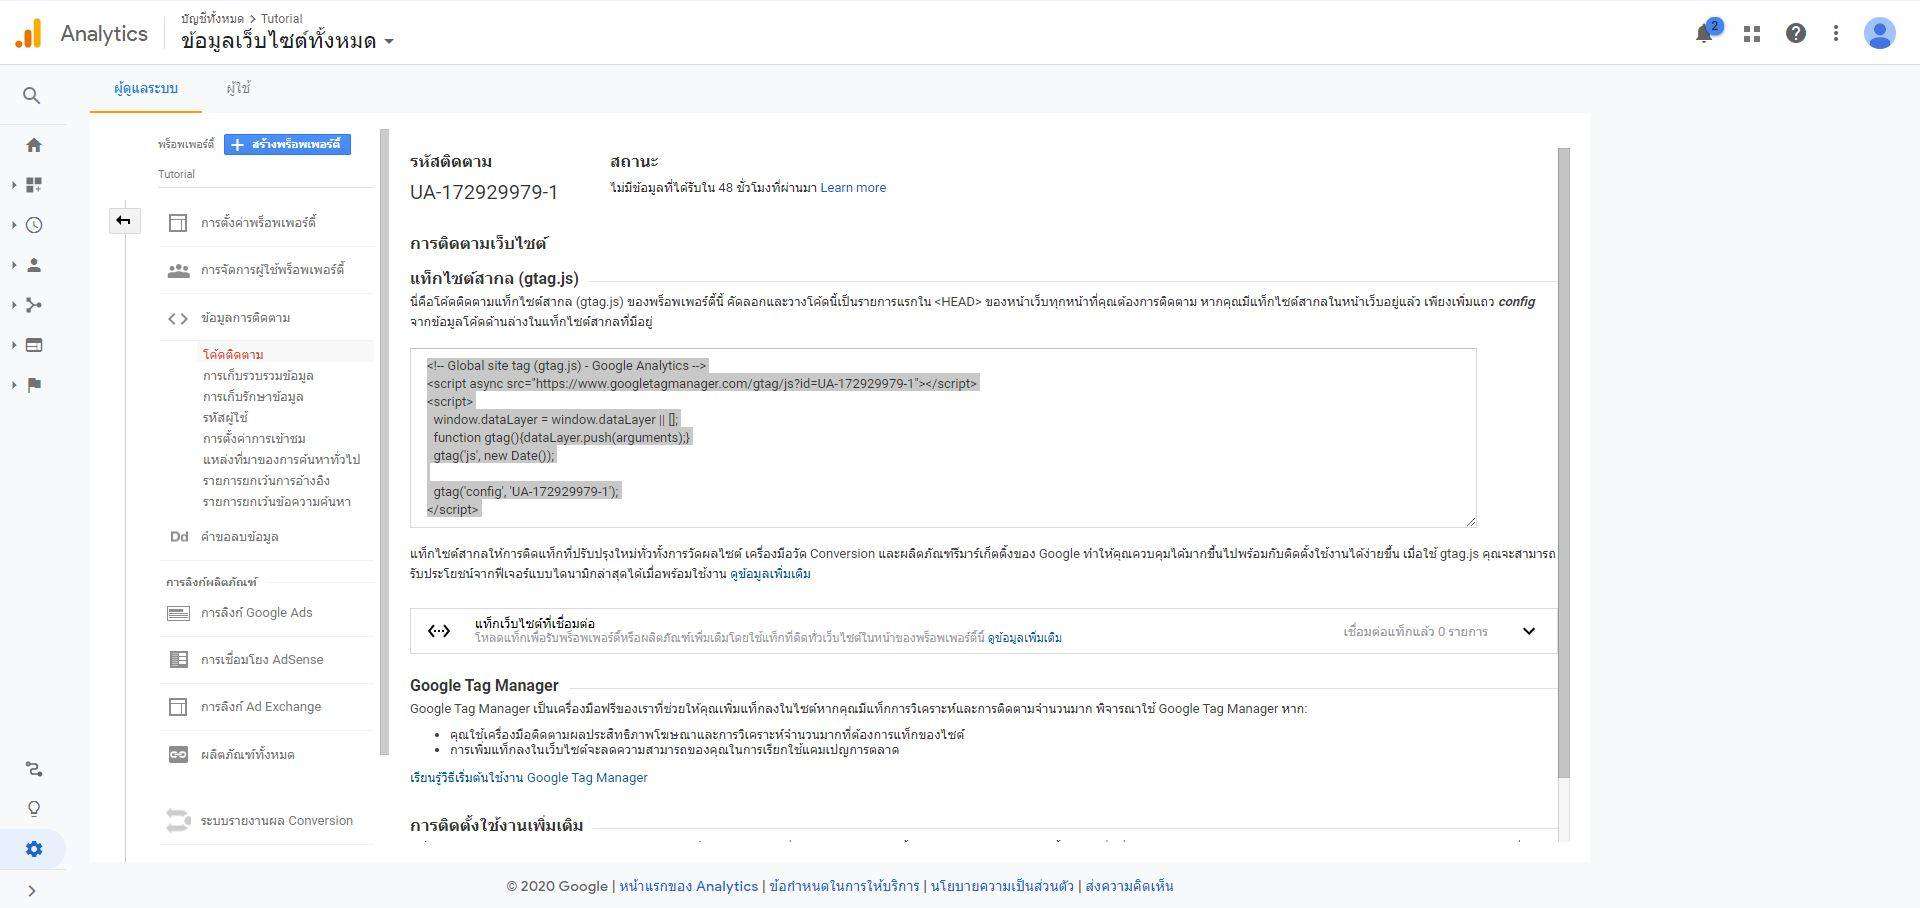
4. Then copy the command code and paste it at the <Head>…</Head> section of every page on the website that we want to collect data and send it to Google Analytics.
Now you’re done with the Google Analytics installation process. It usually takes 24 hours or 1 day to process. If you still don’t see the information immediately after installation, don’t panic. Please wait for 1 day.
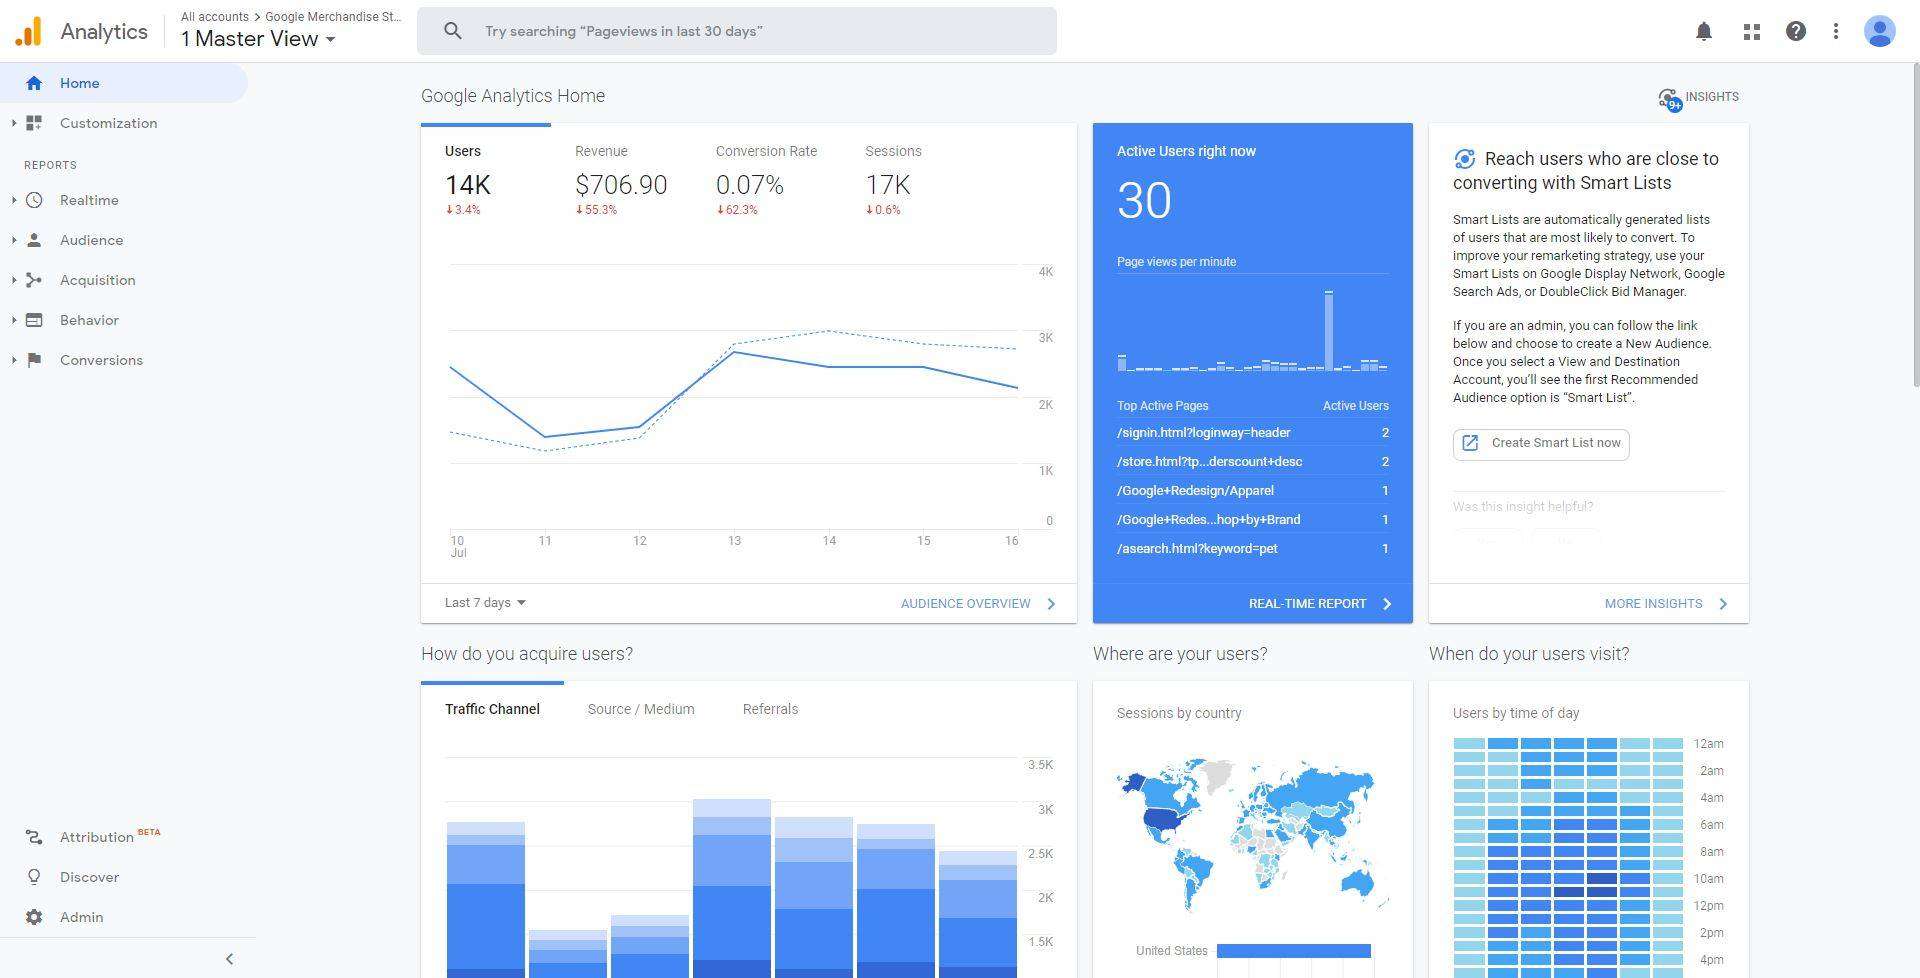
And when Google Analytics is available, it will look like a picture down below. We will see a number of reports of different types of data.
Explore menus and information on Google Analytics.
Once the tag has been installed, this section will discuss the reporting of menu results. which consists of 5 types:
Type 1 Real-time reporting or reporting results in the current period
In this category, you can view all kinds of reporting data that are occurring in the current time, such as how many visitors to the website currently, what channels of traffic to the website are coming from, or whether it is any other type that has a real-time report display.

Type 2 Audience Reporting or Audience Reporting
In this category, we can get general information and user insights about how most of the website visitors have any basic information such as Demographics, Interests, Behavior, and other information.

Type 3: Acquisition reporting or reporting of the method of entering the website of the visitor.
In this category, you will get the traffic information that is the channel or origin of the traffic to the website, which can separate the details of the various channels along with showing other information such as what each channel comes in and what they do after that.

Type 4 Behavior Reporting or Reporting Behavior of Visitors
In this category, you will know the behavior of the website visitors. For example, user A came to the website and which page did they go to? or which page has the highest traffic, etc. This reporting will help to study the customer journey of the website which is beneficial in developing a marketing strategy.

Type 5 Conversion Reporting or Goal Achievement Reporting
In this category, you will find numbers or insights of the success of the set goals and how well the results have been achieved, KPI Margin Ratio, the percentage of conversion from one simple website visitor to one of our customers.

Conclusion
It’s all about how to install Google Analytics and how to get basic insights that you can do by yourself. If the information that occurs on the website has no measurement, we will never know how good the results are. So, Google Analytics is an important tool you should learn and put to good use for optimizing your website and business, making income, and developing further
————————————————————————————————————–
For more information: yeswebdesignstudio.com
Facebook: yeswebdesignstudio
Instagram: yeswebdesign_bkk
Twitter : yeswebdesignbkk


